Images are eternal ties that bind us to our past. From capturing moments in time to our loved ones, from milestones to memories we cannot express in words – all of these can be captured with the help of images. But physical images are subject to wear and tear, while digital images may be affected by digital noise, compression problems, blurriness or extraneous background objects.
Regardless of whether you have a physical heirloom that dates back to the 1950s or a low-resolution image snapped with an older smartphone, it is imperative that you know how to clean images if you want to preserve your legacy.
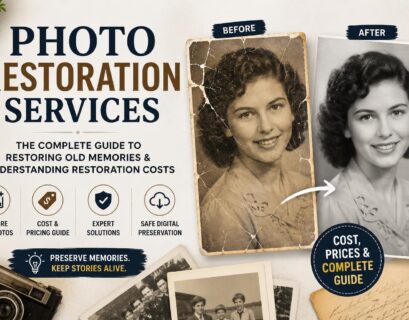
In this guide, you will learn about the techniques for cleaning images, about the ways in which you can clean your images for free and when it is better to leave your memories in the hands of professionals who restore photos.
The Core Philosophy of Cleaning Pictures
Cleaning of pictures is an example of two different worlds. It may be physical conservation and digital optimization. In both cases, we strive to clean the noise to see the signal clearly because noise prevents seeing the beauty of the signal.
But why does it become such an enormous trend now? Firstly, there are a lot of pictures online. Sites such as Pexels, Unsplash, and Freepik offer us millions of clear and high-definition images every day. And when our collections do not meet that quality, we seek methods of cleaning pic designs to use it on modern screens and printing.
Digital Cleanup vs. Physical Cleanup: Understanding the Difference
Before downloading software or buying physical cleaning kits, you must analyze the medium of your asset.
Physical Artifacts
If you have an old polaroid, a film negative, or a printed gloss photograph, the cleanup process must be handled with extreme delicacy.
- Dust and Dirt: Over decades, oils from skin and microscopic dust particles bond to the photo emulsion.
- Chemical Degradation: Silver halide prints can tarnish, turn yellow, or develop silver mirroring over time.
- Physical Scraping: Improper storage can scratch the surface layer, physically gouging out visual information.
Digital Artifacts
If your file is already on a computer or phone but looks messy, your goal is completely digital.
- Sensor Dust: Dark spots caused by a dirty camera sensor during shooting.
- Artifacting: Blocky, blurry patches caused by low-quality JPEG saving.
- Blemishes and Elements: Unwanted power lines, trash cans, or stray people ruining a perfect composition.
Regardless of whether your project is tangible or digital, the ultimate goal remains the same: optimizing your assets so they look as immaculate as pristine commercial stock photography.
Physical Methods for Cleaning Photos Safely
Do not rush to use the wet wipes or the common domestic cleanser on your fragile physical print. This would cause the dissolving of the photo emulsion and the wiping out of the picture itself. Here is how you can clean the photos using this secure procedure.
Step 1: Establish a Clean Environment
The print should be handled in a well-ventilated area with no floating dust present. Put on powderless nitrile or latex gloves to prevent degradation from the oils present on your fingertips.
Step 2: Dry Dusting
Begin with the most gentle approach possible. Use a fine camel hair brush or an air blower, such as the type used for cleaning camera lenses, to loosen and lift dust particles off the surface. Compressed air spray should not be used as the extreme pressure may break down emulsion. The chemicals used in compressed air sprays are known to leave oily residues on prints.
Step 3: Dealing with Stubborn Grime
If the dry dusting does not work for removing the tough grime, then care must be taken. When dealing with older silver-based or black and white photographs, it is possible to clean the emulsion using emulsion cleaners or rubbing high purity isopropyl alcohol (99%).
Critical Warning: Never use water or solvents on modern inkjet prints, dye-sublimation prints, or water-damaged historical emulsions, as they will bleed instantly. If a physical print is severely cracked, warped, or stuck to glass, avoid DIY physical cleaning entirely. Instead, scan it exactly as it is and rely on digital photo restoration services to fix the damage safely in the digital realm.
How to Clean Digital Files: Top Free Online Tools
For many people, what matters most is the availability of a simple method of photo cleanup for free online. Your wonderful picture from your vacation could be ruined due to someone else appearing in your scene.
However, due to advances in artificial intelligence technology, this problem became available to everyone. It doesn’t require deep knowledge in sophisticated programs such as Photoshop anymore.
Here are the top ways to start cleaning pics free today using cloud-based platforms:
AI Object Removal Tools
Websites like Photoroom, Magic Eraser, and TinyWow offer dedicated object removal tools completely free.
- How they work: You upload your image, brush over the unwanted object (like a piece of trash or a scratch), and the AI analyzes the surrounding pixels to cleanly fill in the gap.
- Best For: Quickly cleaning pictures that have minor distractions or blemishes.
Digital De-noising and Upscaling Platforms
If your digital files are grainy, pixelated, or low-resolution, platforms like Upscayl (open-source) or VanceAI (free trial tiers) can help.
How they work: They use deep learning models trained on millions of high-resolution images to reconstruct lost details, giving your blurry file a smooth, high-fidelity finish.
Web-Based Layer Editors
If you need more control but don’t want to pay for software, Pixlr and Photopea run directly inside your web browser for free. They offer spot healing brushes, clone stamps, and color correction sliders that give you manual control over cleaning images without hidden costs.
Step-by-Step Guide to Digital Image Enhancement
If you choose to use a free digital image editor, follow this structured, logical sequence to ensure you preserve image quality without over-processing your files.
Step 1: Duplicate Your Base File
Never work directly on your original file. Always save a high-resolution duplicate. If your software supports layers, duplicate your background layer first. This ensures that if an edit goes wrong, your original pixels remain untouched and protected.
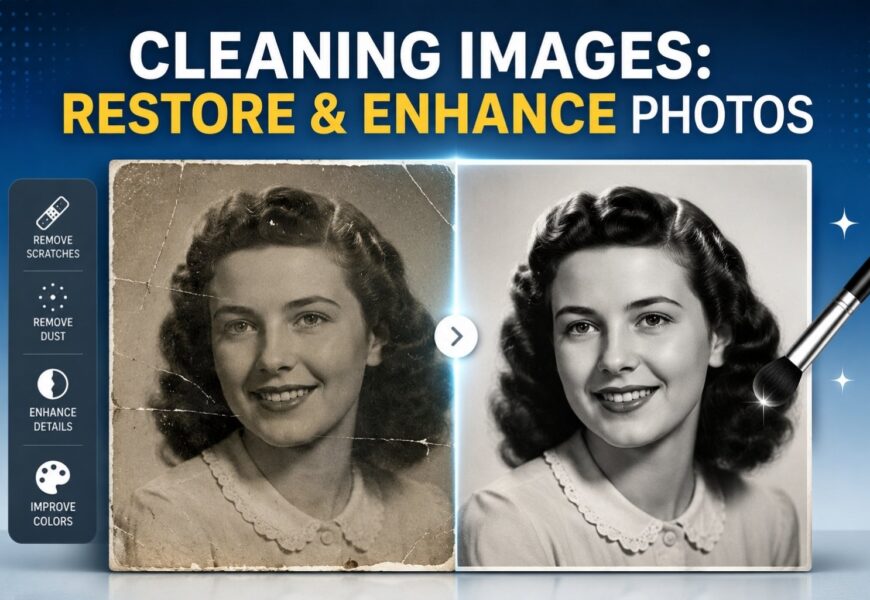
Step 2: Execute Spot Healing for Dust and Scratches
Zoom into the file at 100% or 200%. Select the Spot Healing Brush or Clone Stamp tool. Carefully target individual lines, dust spots, or digital sensor spots. When using a clone stamp, select a sample source area that closely matches the texture, lighting, and grain structure of the target area you are cleaning.
Step 3: Global Tone & Exposure Balance
Once the surface anomalies are removed, analyze the contrast. Old photos often lose their deep blacks and bright whites, resulting in a muddy, grey appearance. Open your editor’s Levels or Curves adjustment layer. Bring the black slider inward until it touches the edge of your image histogram, and do the same for the white slider. This instantly restores depth and punch to your washed-out imagery.
Step 4: Correcting Color Fading and Color Casts
Old color prints from the 1970s and 1980s often develop an unpleasant red, magenta, or yellow color cast due to chemical breakdown. Use the color balance or selective color tools to pull back the dominant color cast. If the image is a black-and-white print that has yellowed with age, converting the entire file to a pure grayscale format can instantly remove decades of ugly staining.
Evaluating the Limits of DIY Photo Editing
While utilizing free tools for cleaning pic layouts is a great starting point for amateur hobbyists, DIY approaches have definitive limits. It is easy to accidentally over-process an image, leaving it looking plastic, artificial, or fundamentally altered.
| Aspect | DIY Free Digital Cleaning | Professional Photo Restoration |
| Complexity of Damage | Ideal for minor scratches, sensor dust, and basic color fading. | Capable of rebuilding torn sections, missing faces, and severe mold damage. |
| Tool Precision | Automated AI tools may create blurry patches or weird artifacts. | Manual, pixel-by-pixel restoration ensures anatomical and structural accuracy. |
| Time Investment | Quick (minutes to hours depending on user skill). | Can take hours of meticulous expert labor for a single file. |
| Output Quality | Usually restricted to compressed formats or web-resolutions. | High-resolution, print-ready digital negatives suitable for archiving. |
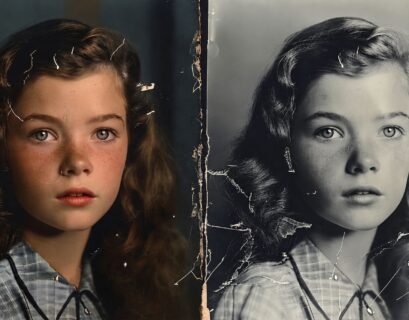
If you are dealing with an invaluable, one-of-a-kind family heirloom that has a tear running directly through a loved one’s face, relying solely on automated apps for cleaning pics free can ruin the authenticity of the portrait. This is the exact intersection where it is vital to consult professional photo restoration services.
When to Call the Experts: Photo Restoration Services
A dedicated professional service does not just click an automated automated AI button. They blend digital artistry, historical knowledge, and precise software mastery to repair imagery without losing its historical soul.
Professional photo restoration services specialize in high-stakes recovery scenarios, including:
- Reconstructing Missing Data: If a corner of a photo is torn off, a skilled artist can replicate the missing background, clothing textures, or facial structures by referencing other sections of the image or historical context.
- Severe Water and Mold Damage: Water damage causes layers of paper to stick together and grow mold, obliterating large swathes of details. Pros use advanced digital separation techniques to peel back the visual layers.
- Advanced Colorization: Turning a faded black-and-white photograph into a historically accurate color masterpiece requires an understanding of period-accurate clothing dyes, skin tones, and environmental lighting.
When you choose to invest in comprehensive photo restoration services, you are purchasing long-term security for your memories. They provide a pristine digital file that can be copied, shared across your entire family, and printed safely for generations to come without risking the fragile original physical artifact.
Preserving and Storing Cleaned Images for the Long Term
Once you have spent time cleaning images digitally or received your beautifully preserved files back from professional providers, your next priority is implementing a bulletproof preservation system to ensure they never degrade again.
Archiving Physical Media
- Climate Control: Store physical photographs in cool, dry spaces. Avoid humid basements or hot attics, which accelerate chemical breakdown and encourage destructive mold growth.
- Acid-Free Storage: Never store historical images in cheap plastic bins or adhesive “magnetic” albums from the 1980s. Use acid-free, lignin-free archival storage boxes and museum-grade Mylar sleeves.
- Handle with Care: Always wash your hands before handling physical prints, or stick to clean nitrile gloves to prevent damaging the emulsion.
Backing Up Digital Assets
To safeguard your freshly optimized digital files, adhere to the industry-standard 3-2-1 backup rule:
- Maintain at least 3 copies of your photo library.
- Store those copies on 2 different media types (e.g., your computer’s internal SSD and an external backup hard drive).
- Keep 1 copy off-site using a secure cloud storage solution (like Google Drive, iCloud, or Backblaze).
Conclusion: Honoring Your Past with Crisp Imagery
Taking the time to invest in cleaning pictures is a powerful act of love and preservation. From utilizing quick web platforms for cleaning photos free to deploying full-scale, premium photo restoration services for badly damaged historical documents, every step you take ensures that your family’s history remains clear, vibrant, and alive.
Don’t let your most valuable memories fade away into dark drawers or remain trapped in pixelated, low-quality formats. Explore the free tools available today to experiment with cleaning up your basic files, and connect with seasoned professionals when you need your most delicate, historic heirlooms brought back to life with museum-grade precision.